Measure Twice, Order Once: How to Measure a Disc Blade
When it’s time to replace a worn disc blade, coulter blade, opener, or other bolted wear part, knowing the equipment make and model is a great place to start—but it isn’t always enough.
Farm equipment gets rebuilt, modified, and fitted with different components over its lifetime. That’s why taking a few measurements from the existing part can be one of the easiest ways to confirm you’re ordering the right replacement.
One of the most important measurements is the bolt pattern, also called the bolt circle or bolt circle diameter (BCD). (1)
Here’s how to measure it.
What Does Bolt Pattern Mean on a Disc Blade?
The bolt pattern describes the arrangement of the mounting holes around the center of a disc blade or other wear part.
A bolt pattern is typically identified using the number of bolt holes and the diameter of the imaginary circle that passes through the center of those holes. (1)
For agricultural replacement parts, however, bolt pattern is only part of the picture. Depending on the application, you may also need to know the blade diameter, thickness, center-hole diameter, bolt-hole diameter, and whether the blade is flat, notched, or has another specific configuration. (2)
Taking all of these measurements can help narrow down the correct replacement when multiple blades look similar.
Step 1: Count the Bolt Holes
Start with the easiest measurement: count the mounting holes around the center of the blade.
Write down the total number of holes. This becomes the first part of the bolt pattern.
Keep in mind that the number of holes alone doesn’t identify the pattern. Two disc blades can have the same number of mounting holes but different spacing or hole diameters.
Step 2: Measure the Bolt Circle Diameter
Next, determine the bolt circle diameter.
Even Number of Bolt Holes
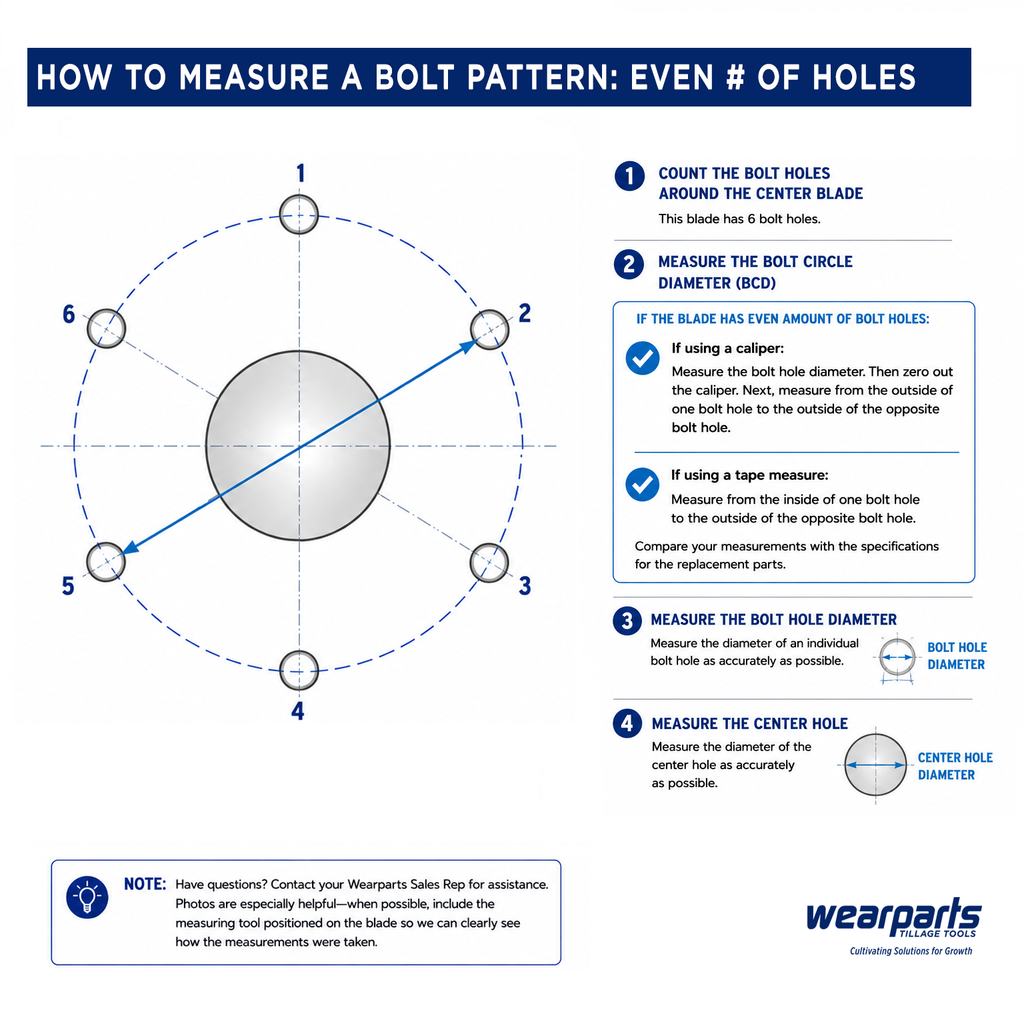
If the blade has an even number of equally spaced bolt holes, such as four, six, or eight, choose one hole and locate the hole directly opposite it.
Measure:
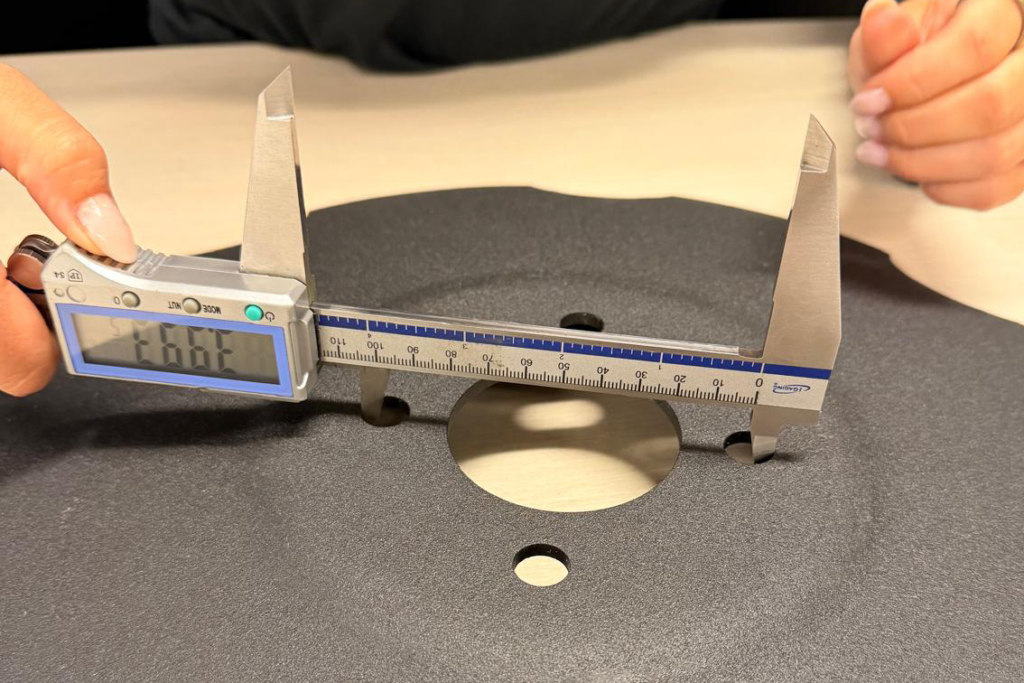
With a caliper: Measure the bolt hole, zero out the caliper, then measure outside of one bolt hole to the outside of the opposite bolt hole.
With a tape measure: Measure from the outside of one bolt hole to the inside of the opposite bolt hole
That measurement is the bolt circle diameter. Measuring across opposing holes is the standard method for determining bolt circle diameter on an even-numbered pattern. (3)
For example, if your blade has six bolt holes and measures 5 inches from the center of one hole to the center of the opposite hole, you have a 6-hole pattern on a 5-inch bolt circle.
Watch our step-by-step demonstration for measuring an even-numbered bolt pattern and getting the measurements you need to identify the correct replacement part.
Odd Number of Bolt Holes
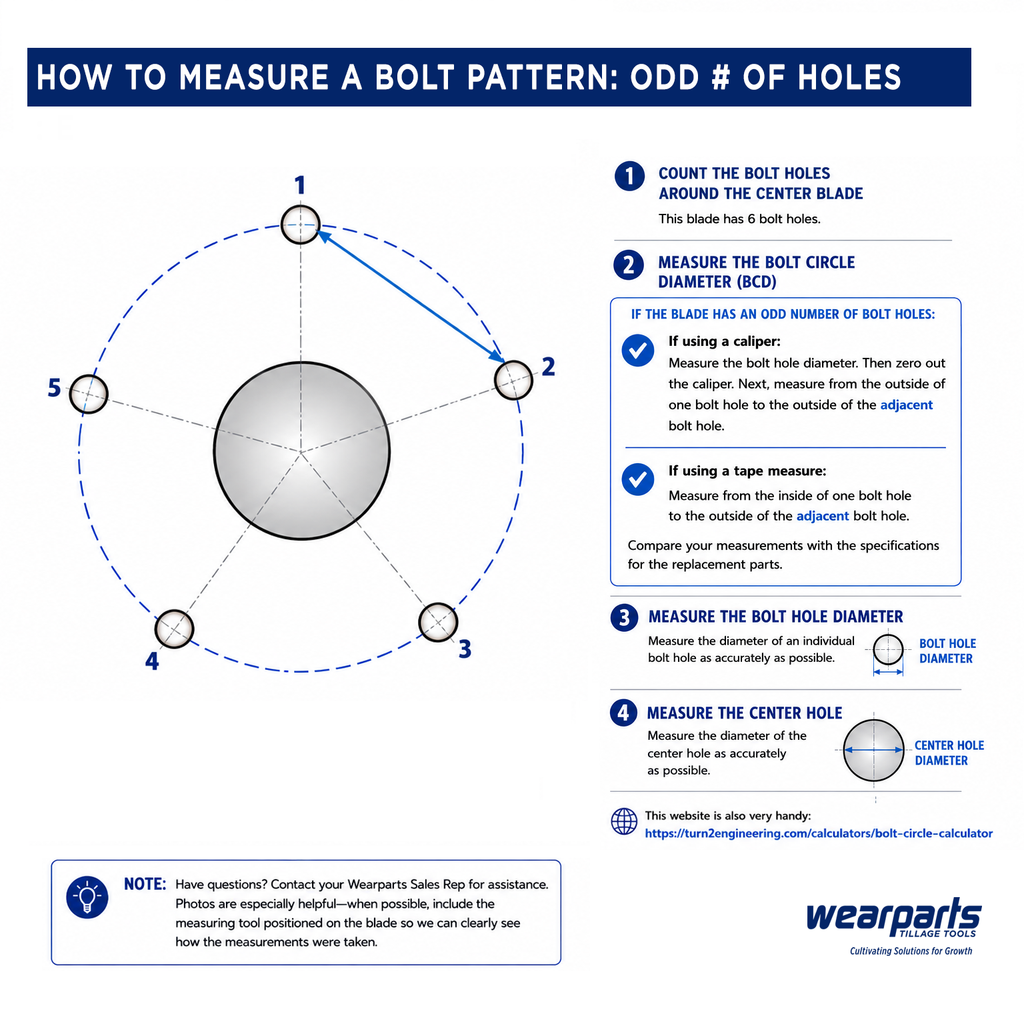
Odd-numbered patterns require a different measurement because there isn’t a mounting hole directly across the center.
For these patterns, the bolt circle is still the imaginary circle running through the centers of all of the mounting holes. (1)
With a caliper: Measure the bolt hole, zero out the caliper, then measure outside of one bolt hole to the outside of the adjacent bolt hole.
With a tap measure: Measure from the outside of one bolt hole to the inside of the adjacent bolt hole
Take careful measurements between the mounting holes and compare them with the specifications for the replacement part. When in doubt, contact the Wearparts team with your measurements, equipment information, and photos of the existing blade – photos with the measuring tool included are especially useful.
Watch our step-by-step demonstration for measuring an odd-numbered bolt pattern and getting the measurements you need to identify the correct replacement part.
You can use this online tool to aid in calculating the correct bolt circle diameter: Bolt Circle Calculator: Calculate Bolt Patterns Easily.
Step 3: Measure the Bolt Hole Diameter
Don’t stop at the bolt circle.
Measure the diameter of an individual bolt hole as accurately as possible. Calipers are especially useful for this measurement.
Bolt-hole size matters because two blades can have a similar overall configuration but be designed for different mounting hardware.
If the holes are badly worn or elongated, measure several holes and use the least-worn area to help determine the original diameter.
Step 5: Measure the Center Hole
If your disc blade or wear part has a center mounting hole, measure its diameter as well.
Center-hole size can be an important fitment specification and should be recorded along with the bolt-hole diameter and bolt circle.
Step 6: Measure the Rest of the Blade
Before ordering a replacement, record the rest of the blade’s key dimensions.
While not essential to measuring the bolt circle diameter, recording the overall blade diameter and thickness can also be helpful. Depending on the application, you may also need to identify the blade shape, concavity, number of notches, or other design features. Agricultural disc blades are manufactured in a wide range of diameters, thicknesses, hole configurations, and blade styles for different tillage applications.
A worn blade may no longer measure its original diameter, so equipment make, model, and existing part numbers can provide additional clues.
Measure Twice. Order Once.
When you’re in the middle of planting or tillage season, the last thing you need is to discover that the replacement blade you ordered doesn’t match your equipment.
Before ordering, record:
- Number of bolt holes
- Bolt circle diameter
- Bolt-hole diameter
- Center-hole diameter
- Equipment make and model.
If you’re still not sure which disc blade, coulter, opener, or other wear part you need, contact Wearparts. Send us your measurements, equipment information, and a photo of the existing part, and our team can help you find the right replacement and get you back in the field.
Sources
(1) Fastenal. Fastener Product Specifications and Measurement Information. https://www.fastenal.com/products/attribute/600040/2
(2) Wearparts LLC. Disc Blades. Wearparts product specifications and application information. https://wearpartsllc.com/product-category/disc-blades/
(3) Bolt Depot. Fastener Measurement Information. https://boltdepot.com/Fastener-Information/Measuring